Before reading this you must read previous article regarding php execution, which give us detail information about php execution steps, server use,etc. To read that click here.
For this we require three steps. These are as follows:-
For this we require three steps. These are as follows:-
1. HTML Page:-
First we have to write code for simple user interface. The interface must be coded in HTML. It contain at least two text boxes (username & password). Login button. And two labels. The HTML code must look like as follows.
<form name="login" method="post" action="http://localhost/Nikhil/Connection.php">
In the above code we see that "login" is form name. "post" is type of method to transfer data. "http://localhost/Nikhil/Connection.php" is tell us about next page to be open after pressing submit button. When we press submit button it will send all data in the page to next page. You must save this file under this directory:- "C:\wamp\www\Nikhil". We apply some logic in next page. To download HTML code click here.
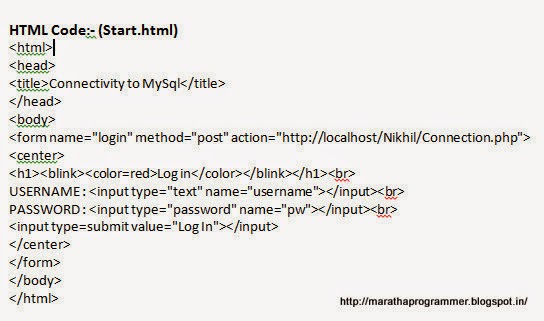 | |||
| HTML code |
2. PHP Code:-
When we press submit button we will diverted to Connection.php page.
mysql_connect("localhost","root","root") or die(mysql_error()) :- This code connect to MySQL database with "root" as username & password. If it fail in doing this it will print error message.
mysql_select_db("Authenticate") or die(mysql_error()) :- This code select "Authenticate" as our database on which we have to work.
$data=mysql_query("select * from Users") or die(mysql_error()) :- This code will execute required database query.
And then we apply our logic there. To find right or wrong user. You must save this file under this directory:- "C:\wamp\www\Nikhil" as Connection.php.To download php code click here.
 | ||
| PHP code |
3. MySQL Database:-To download MySQL click here. We have to create MySQL database with name as "Authenticate". Create table with name "Users" under the Authenticate database. The database must look like as below:-  MySQL database 4. Execution:-We have to start server. then type link "http://localhost/Nikhil/Start.html" in browser. Then we see Login page. If we insert correct username & Password it will give output as below. I. Successful Login Attempt:-   Successful Login II. Un Successful Login Attempt:-   UnSuccessful Login Hope this will help you. Note:- This is basic tutorial only for beginners. If you want to develop website then you have to implement certain security concepts like password encryption, Session tracking, etc. |


